So you want to run your own Shogo server?
We've been trying to make that easy and have built a new server that will update this site, just like in the old days!
Server Download
Download Shogo Server Installer (281MB)
So the first thing to do is to download the server using the link above, then click next a few times until the installation is complete.
Then you are going to want to run the server (which can be found in the start menu as "Run SHOGO Server" and then follow these steps:
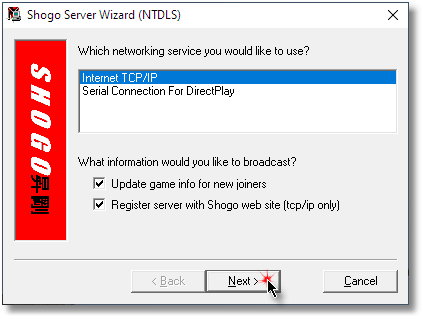
Network Screen:
Here you are going to want to select TCP/IP, anything else would be uncivilized and also highly not-recommended these days.

Extras:
Here you can load additional resource files. Beleive it or not, I'm not a Shogo aficionado, so I'm not entirely sure which ones you'd want to load.
What I do know is that if you select some of these, the server will just crash when you start it - so... experiment and get back to me?

Server:
Give your server a cool name! Set some conditions on map rotations and select a port. The default is 27888 by the way.

Options:
As if there weren't enough options already. Be sure that "Tractor Beam" is selected or people will hate your server. Otehr than that, you are on your own here.

Maps:
This is the fun part. Select some maps! You can select original retail maps as well as user created maps. If you downloaded the server from here, it came preinstalled with a ton of extra maps.

Running:
If you did things right, you should see a screen like this. It means that your computer is now ready to accet incomming connections from Shogo clients.

Router/Firewall:
You will also want to:
- Either add an exception to your Windows firewall or disable it entirely./li>
- Add port forwarding to your router to allow incomming connections from the internet.
Notes:
I wrote this in 2022 running Windows 10. I had the best luck runing the server as an administrator with elevated privileges.
Things like saving the selected levels and configuration will require this.
You can automate the server by passing the server.cfg file as a paramater and passing the parameter -go to bypass all of the configuration dialogs.
I added another server option called MaxRunMinutes which you can also include in the cfg file. This will cause the server to exit after n-minutes.
|
|
|
|

